

The vegetable juice I used to buy from the refrigerated case at the grocery store had more sodium listed on the label than the soup two shelves over, and once I started actually reading labels a few years back, that stopped sitting right with me. I wanted the real thing, carrots and celery and a little apple pressed into a glass that morning, not something poured from a carton with a shelf life measured in months. What kept me from making my own for years was the idea of the machine itself. Every juicer I saw pictured online looked like it belonged in a restaurant kitchen, tall, wide, with a pulp bin the size of a mixing bowl, and I only have about three feet of usable counter between my stove and my sink.
What changed that for me was a compact machine called the magic bullet Mini Juicer, a small countertop juicer with a narrow two-inch feed chute and a 16-ounce cup that catches the juice as it comes out. It is closer in size to a coffee maker than to those restaurant-style machines, and it has become the thing I reach for most mornings when I want a glass of fresh carrot or celery juice without turning breakfast into a production. This is the five-step method I settled into after regular use, in the order I actually follow it, start to finish.
Tired of Vegetable Juice That Comes From a Carton?
Store-bought juice sits in a carton for months and carries more sodium than most people realize. The magic bullet Mini Juicer is the compact machine I use for the five-step method below, small enough to leave out on a narrow counter. See today's price and current availability on Amazon.
Amazon Check Today's Price on Amazon →Step 1: Wash Everything and Cut It to Fit a Two-Inch Chute
I rinse every piece of produce under running water before it touches the cutting board, even the carrots I trust came from a clean bin, just out of habit. Anything with a firm, edible skin, like carrots or apples, I leave alone. Anything with a waxy or bitter skin, like a cucumber that has been coated for shelf life, I peel first. The chute on the magic bullet Mini Juicer is two inches wide, which is narrower than it looks in photos, so a whole carrot or a full stalk of celery will not drop through on its own. I cut everything into pieces roughly the size of my thumb, small enough to feed in without forcing, but not so small that I am standing at the cutting board longer than I am at the juicer.
Beets and cucumber both go through the same two-inch chute without trouble once they are cut down, though a beet takes a little more work with the knife than a carrot does, since the skin is tougher and the flesh is denser. I keep those for weekends when I have a few extra minutes, and stick to carrots, celery, and apple on weekday mornings when I am moving faster.
I keep a small bowl next to the cutting board for the cut pieces, so by the time I am ready to juice, everything is already prepped and waiting instead of me chopping one carrot, feeding it, chopping the next, and losing my rhythm halfway through. This step takes me about five minutes for a full batch, and it is really the only part of the whole process that involves a knife, so I do not rush it.

Step 2: Build a Ratio That Actually Tastes Good
My go-to ratio for one 16-ounce cup is roughly four carrots, two stalks of celery, and half a green apple, sometimes with a small piece of ginger if I have some on hand. Carrots and celery on their own can come out a little flat and vegetal, and the half apple is what keeps it drinkable without turning the whole glass into apple juice. I did not land on this ratio right away. My first few batches were mostly carrot, and while it was fine, it was also a little one-note, glass after glass.
One thing I learned the honest way is that this machine is not built for leafy greens. I tried running a handful of spinach through it once on its own and got back very little liquid for the effort, mostly wilted green pulp. If leafy greens are a big part of what you want to drink, this particular juicer is going to disappoint you. It does firm vegetables and fruit well, carrots, celery, apples, beets, cucumber, and that is where I keep my ratios.
I do not measure with cups and spoons for this anymore, I just know what four carrots and two celery stalks looks like in my prep bowl, but when I was starting out I wrote my ratio down on an index card taped inside the cabinet door. If you are new to this, I would suggest doing the same for the first couple of weeks, until you know your own version of the ratio by feel instead of by guesswork.
The ratio also shifts a little with the season. In late summer, when cucumbers are cheap and plentiful from the farm stand near us, I swap one celery stalk for a few thick cucumber slices, and the juice comes out lighter and a bit more refreshing for the warmer mornings. Come fall, I lean harder on beets and apple, which give the juice a deeper color and a sweeter edge that feels right once the weather turns. None of this is a strict rule, just what I have noticed tastes best with whatever is actually in season and sitting in my kitchen that week.

Step 3: Feed the Chute a Few Pieces at a Time
With the cup locked onto the base and the lid on, I feed the chopped produce in a few pieces at a time rather than dumping the whole bowl in at once. The motor is rated at 400 watts, which handles firm vegetables without much strain, but it works better when it has a steady stream of small pieces to pull through rather than a jam of everything at once. I drop in a couple of carrot pieces, let the sound of the motor settle, then add a couple more, alternating with celery and the apple pieces as I go.
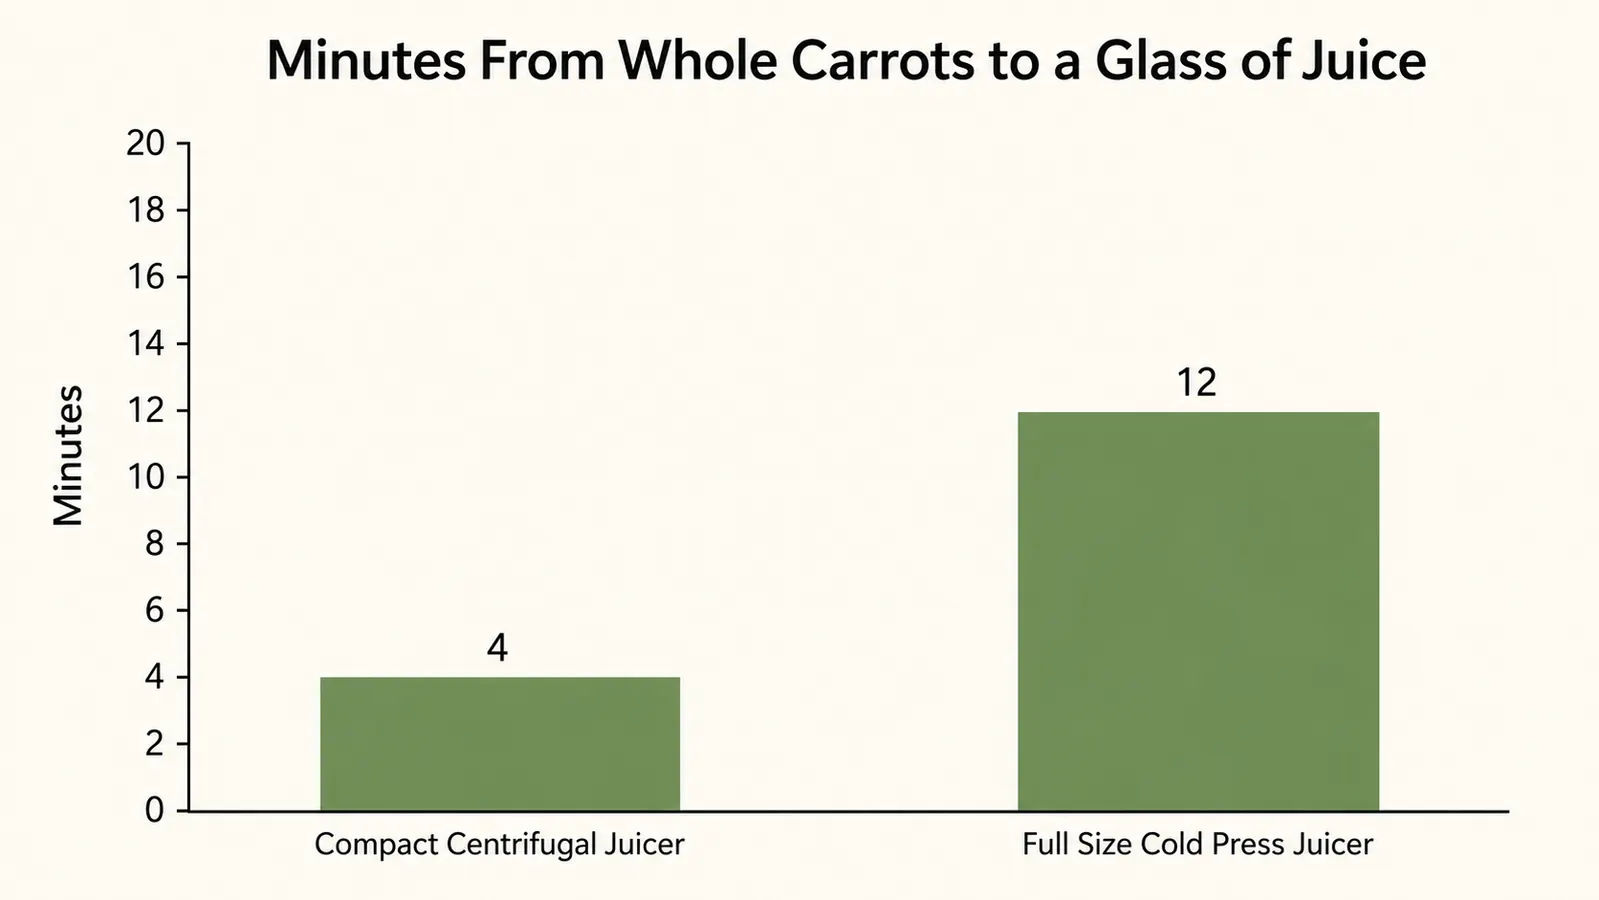
It is not a quiet machine. I try to run it after my husband is already up, because it is loud enough that I do not think it would let anyone sleep through it in the next room. The whole batch, four carrots, two celery stalks, and half an apple, takes me somewhere around two to three minutes from the first piece in the chute to the last drop of juice, which is a fraction of what I would spend feeding the same produce through a full-size juicer a few strips at a time.
If the motor sound changes or seems to be straining, I stop, give the chute a light shake to loosen whatever is stuck, and keep going rather than forcing more produce in on top of a jam. That has only happened to me a handful of times, usually when I got impatient and dropped in a piece that was really too big for the chute instead of cutting it down first. The base itself is light enough that I can hold it steady with one hand while I feed produce with the other, which matters more than it sounds like it would when my grip is tired by that point in the morning.
Step 4: Taste, Adjust, and Pour Before It Sits Too Long
Once the cup is full, I lift it off the base and give the juice a taste before I pour it. If it tastes too vegetal, a small extra piece of apple run through fixes that faster than anything else I have tried. If it tastes too sweet for my liking that particular morning, a squeeze of lemon does the opposite job. This is the step where I adjust to how I actually feel that day rather than sticking rigidly to the same ratio every single time.
I pour it straight from the cup into a glass rather than trying to strain it further or transfer it somewhere else first, since the cup on this juicer is really the whole point of a compact machine. Fresh vegetable juice starts separating and losing some of its color within a day or two in the fridge, faster than a full-size cold-press machine would produce, so I try to pour and drink it within a few minutes rather than making a big batch to save for later in the week.
On mornings when my husband wants a glass too, I run a second small batch right after the first rather than trying to stretch one cup between the two of us. It only adds another two or three minutes, and each glass comes out freshly poured instead of one of us drinking juice that has already started to sit and separate a little while waiting.
Step 5: Rinse the Cup, Blade, and Lid Right Away
This last step is the one that actually decides whether I keep doing this most mornings or quietly stop after a couple of weeks, and it has to happen right after pouring, not after I have finished drinking. Pulp rinsed within a minute or two wipes out easily under warm water. Let it sit for even twenty minutes and it starts to dry against the sides of the cup and the strainer basket, and a thirty-second rinse turns into real scrubbing with a brush.
The cup, the blade, and the lid are all dishwasher safe, and I run them through the top rack most days, though a quick hand rinse works just as well if I am in a hurry. It is a small number of pieces compared to what I remember seeing on the full-size cold-press machine my friend owns, and that difference is a real part of why I still reach for this juicer most mornings instead of letting it sit unused in the cabinet.
What Else Helps
A little bit of prep on the weekend makes weekday mornings faster. I wash and chop a few days' worth of carrots and celery at once and keep them in a container in the fridge, so most mornings all I am doing is opening the container and feeding the chute, not standing at the cutting board before I have had any coffee. I also keep whatever leftover pulp collects in the strainer basket, since it is still visibly damp rather than dry and powdery, and I have started stirring a spoonful of it into my morning oatmeal instead of throwing it away.
I also keep the cup, the blade, and a spare lid on a small tray right next to the juicer rather than putting everything away in a cabinet between uses. On a counter this size, having the pieces already staged means the whole process, from pulling the prep container out of the fridge to rinsing the cup afterward, takes well under ten minutes start to finish, and that is really what keeps this a daily habit instead of something I only do when I feel ambitious.
I go into more detail on how this particular machine has held up after regular use in my long-term review of the magic bullet Mini Juicer, and if you are trying to decide between a compact juicer like this one and a full-size machine, I compare the two honestly, including where the bigger machine actually wins, in magic bullet Mini Juicer vs Cold Press Juicer. Between the two, you will have the fuller picture, but the five steps above are the part that actually gets fresh juice into your glass most mornings.
The trouble was never wanting fresh juice. The trouble was thinking I needed a machine the size of a small toaster oven to have it.
Ready to Trade the Carton for a Fresh Glass?
Five steps, a two-inch chute, and a handful of dishwasher-safe parts to rinse afterward. If a bulky juicer has kept you from starting, see today's price on the magic bullet Mini Juicer and current availability on Amazon.
Amazon Check Today's Price on Amazon →